Real-Time Style Transfer Plugin
Making a game look like a painting at 60fps. A GDExtension plugin that hooks PyTorch into Godot's rendering pipeline via C++, and everything that went wrong along the way.
The Problem
I wanted to make a game look like a painting in real-time. Not a static filter, not a post-process shader pretending to be painterly. Actual neural style transfer, running live inside a game engine at playable framerates.
A walkthrough of the architecture and results, with a brief demo at the end.
The rest of this page is the long version.
The Baseline: 45 Seconds Per Frame
I started where anyone would: the original Gatys et al. paper. The idea is beautiful. You take a content image and a style image, then iteratively optimize the pixels until the output looks like the content painted in the style.
def style_transfer(content, style, iterations=500):
    # This took 45 seconds per frame
    for i in range(iterations):
        optimize_step(content, style)
    return content
The results were gorgeous. The performance was not.
45 seconds. Per frame. For a game targeting 60fps, I needed to be roughly 2,700 times faster.

The Fix: Don’t Optimize at Runtime
The breakthrough came from Johnson et al.’s feed-forward approach. Instead of running 500 optimization steps per frame, you train a neural network once to perform the style transformation in a single forward pass.
Gatys et al. (2016):              Johnson et al. (2016):

┌──────────┐                      ┌──────────┐
│  Input   │                      │  Input   │
│  Frame   │                      │  Frame   │
└────┬─────┘                      └────┬─────┘
     │                                 │
     ▼                                 ▼
┌──────────┐                      ┌──────────┐
│ 500 iters│                      │  Single  │
│ of VGG   │                      │ Forward  │
│ backprop │                      │  Pass    │
└────┬─────┘                      └────┬─────┘
     │                                 │
~45 seconds                        ~16ms
     │                                 │
     ▼                                 ▼
┌──────────┐                      ┌──────────┐
│ Stylized │                      │ Stylized │
│  Output  │                      │  Output  │
└──────────┘                      └──────────┘

Beautiful but slow.               Fast enough for games.
The tradeoff: you lose flexibility (one trained network per style) but gain real-time performance. For a game engine plugin, that’s exactly the right deal.
Now I just had to build it, train it, export it to C++, link it against libtorch, compile it as a GDExtension shared library, and hook it into Godot’s rendering pipeline. Starting from this:
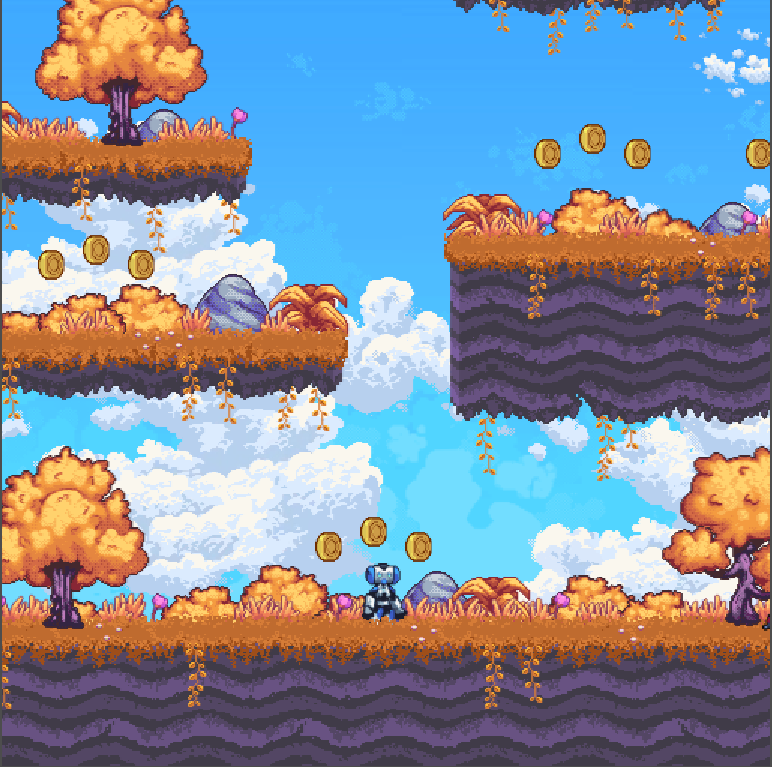 the starting point, a crisp pixel-art platformer
 The Model
Both model variants are tiny. The slim model is 110kB on disk. The normal model is 196kB. For reference, the JPEG header image on most blog posts is bigger than the entire neural network.
Architecture
Both follow an encoder-residual-decoder pattern with only 16 channels throughout, compared to the 128 channels in Johnson et al.’s original. The key difference between variants is depth:
Slim (110kB, 1 res block):         Normal (196kB, 5 res blocks):

Input (3ch)                        Input (3ch)
    │                                  │
    ▼                                  ▼
┌────────────┐                     ┌────────────┐
│ Conv 3→16  │ ×3 layers           │ Conv 3→16  │ ×3 layers
│ stride 1,2,2                     │ stride 1,2,2
│ IN + ReLU6 │                     │ IN + ReLU6 │
└─────┬──────┘                     └─────┬──────┘
      │                                  │
      ▼                                  ▼
┌────────────┐                     ┌────────────┐
│  1× Res    │                     │  5× Res    │
│   Block    │                     │  Blocks    │
└─────┬──────┘                     └─────┬──────┘
      │                                  │
      ▼                                  ▼
┌────────────┐                     ┌────────────┐
│ Upsample   │ ×2 + final conv    │ Upsample   │ ×2 + final conv
│ 16→16→3    │                     │ 16→16→3    │
└─────┬──────┘                     └─────┬──────┘
      │                                  │
      ▼                                  ▼
Output (3ch)                       Output (3ch)

57kB VRAM  ·  52 FPS               129kB VRAM  ·  47 FPS
        (at 600×400)                        (at 600×400)
The choice of ReLU6 over standard ReLU is a mobile-optimization trick; it clamps activations to [0, 6], which helps with quantization stability. InstanceNorm with affine parameters handles the style-specific normalization.
Training
Trained on Pascal VOC 2012 (~11,500 natural images) for content, with four style images: Monet, Udnie, Mosaic, and Van Gogh’s Starry Night. 5 epochs, Adam optimizer, learning rate 1e-3.
The loss function is where style transfer gets interesting. We use a pre-trained VGG-16 as a “perceptual judge”:
L_total = α·L_content + β·L_style + γ·L_tv
With weights: style_weight = 1e5, content_weight = 1e0, tv_weight = 1e-7.
That style weight is 100,000× the content weight. You’re basically telling the network: “I care about looking like Van Gogh way more than I care about looking like the original scene.”
The mathematical heart of style transfer is the Gram matrix, which captures texture statistics by computing correlations between feature channels:
def gram(x):
    (bs, ch, h, w) = x.size()
    f = x.view(bs, ch, w*h)
    f_T = f.transpose(1, 2)
    G = f.bmm(f_T) / (ch * h * w)
    return G
Four lines. That’s what makes a photograph look like a painting.
Key Modifications
The original model was hardcoded for 256×256 inputs, useless for a game
with a dynamic viewport. I refactored it to be fully convolutional, replacing
hardcoded dimensions with relative scaling factors in the upsampling layers.
After training, models were exported to TorchScript via torch.jit.trace
and optimized with torch.jit.optimize_for_inference() for the C++ side.
I also evaluated both models against ~8,000 screenshots from MAME console games, because if you’re building this for game engines, you should probably test on actual game content, not just photos of dogs.
The Bridge
This is where it gets hairy. The goal: make a PyTorch model run inside Godot’s render loop, every frame, without the engine noticing.
The Scene Setup
The Godot scene is deceptively simple:
Node2D (root)
  │
  ├── Game (SubViewport)           ← the actual game runs here
  │     size: 512×256                 renders to a texture
  │
  ├── Sprite2D                     ← displays the stylized output
  │     position: (512, 299)
  │
  ├── MyCustomNode (GDExtension)   ← the magic middleman
  │     viewport_path: ../Game
  │     display_sprite_path: ../Sprite2D
  │
  └── Sprite2D2                    ← small preview of original
        texture: ViewportTexture(Game)
The GDScript that wires it up is exactly three lines:
extends MyCustomNode

func _ready():
    set("viewport_path", NodePath("../Game"))
    set("display_sprite_path", NodePath("../Sprite2D"))
Everything else happens in C++.
The C++ Pipeline
Every frame, _process grabs the viewport texture, runs it through
the model, and pushes the result back. Here’s the core of process_image,
stripped of debug logging:
// 1. Convert RGBA → RGB
processed_image->convert(Image::FORMAT_RGB8);

// 2. Borrow Godot's pixel data (no copy!)
PackedByteArray data = processed_image->get_data();
torch::Tensor tensor = torch::from_blob(
    const_cast<void*>(static_cast<const void*>(data.ptr())),
    {height, width, 3}, torch::kUInt8
).to(torch::kFloat32);

// 3. Normalize with ImageNet stats
tensor = tensor / 255.0f;
tensor = tensor.permute({2, 0, 1}).unsqueeze(0);  // HWC → NCHW
tensor = (tensor - mean_tensor.view({1,3,1,1}))
       / std_tensor.view({1,3,1,1});

// 4. GPU transfer + inference
if (torch::cuda::is_available())
    tensor = tensor.to(torch::kCUDA);
torch::Tensor output = model.forward({tensor}).toTensor();

// 5. Denormalize and copy back to Godot
output = output * std_tensor.view({3,1,1})
       + mean_tensor.view({3,1,1});
output = output.clamp(0, 1) * 255.0f;
output = output.to(torch::kUInt8)
               .permute({1, 2, 0}).contiguous();  // NCHW → HWC

memcpy(out_data.ptrw(), output.data_ptr<uint8_t>(),
       width * height * 3);
That torch::from_blob on line 5 is borrowing memory directly from
Godot’s PackedByteArray. No copy. The tensor just points at Godot’s
pixel buffer. It’s efficient and also slightly terrifying: if the
PackedByteArray gets garbage collected while the tensor is alive,
you’re reading freed memory. In practice it’s fine because the tensor
is consumed within the same function scope. But it’s the kind of thing
that keeps you up at night.
The Build System Nightmare
Compiling a shared library that links against both godot-cpp and libtorch is an exercise in patience. The SConstruct file has paths like:
env.Append(CPPPATH=[
    '/home/sushanth/Dev/libtorch/include',
    '/home/sushanth/Dev/libtorch/include/torch/csrc/api/include'
])
env.Append(LINKFLAGS=[
    '-Wl,-rpath,/home/sushanth/Dev/libtorch/lib',
])
Yes, those are hardcoded absolute paths to my machine. Yes, this means
nobody else can build it without editing the source. This is my heirarchy
variable, the thing I’ll cringe at in three years but can’t deny shipped
the project on time.
The CUDA story was even worse. Getting cuDNN to cooperate with both libtorch and Godot’s OpenGL context required solving dependency conflicts that would make a package manager weep. We eventually got GPU acceleration working, but it was the single biggest time sink of the project.
The Paradox
Here’s where it gets interesting. We trained both models, benchmarked them carefully, and discovered something that contradicts what you’d expect.
The Numbers
| Metric | Slim Model | Normal Model |
|---|---|---|
| Disk Size | 110 kB | 196 kB |
| VRAM Usage | 57 kB | 129 kB |
| FPS (600×400) | 52 | 47 |
| SSIM (structural similarity) | 0.3047 | 0.2789 |
| LPIPS (perceptual quality) | 0.6055 | 0.6125 |
The normal model (five residual blocks, nearly double the parameters) achieves lower total test loss (17.79 vs. 21.05). By every training metric, it’s the better model.
But the slim model has higher SSIM and less temporal flickering in actual gameplay.
The mathematically “better” model looks worse in practice.
Why the Dumber Model Wins
The training-test gap tells the story. The slim model’s style loss jumps from 2.00 (train) to 8.27 (test), a big generalization gap. The normal model is tighter: 1.64 to 4.71. Conventional wisdom says the normal model generalizes better.
But in a game running at 60fps, temporal consistency matters more than per-frame quality. The slim model’s simpler architecture produces more consistent frame-to-frame outputs. The normal model’s extra capacity lets it be more “creative” with each frame, which means more flickering when the scene changes slightly between frames.
This is a genuinely useful insight: optimization metrics during training don’t always align with quality in dynamic, real-time applications. Static image loss functions can’t capture what it feels like to watch a game where the art style jitters every frame.
The Styles
I trained both models on four artistic styles: Van Gogh’s Starry Night for swirling expressionism, Monet for soft impressionistic pastels, Udnie for bold abstract patterns, and Mosaic for tile-like geometric segmentation.
All four produced visually distinct results on the 2D platformer demo.
original 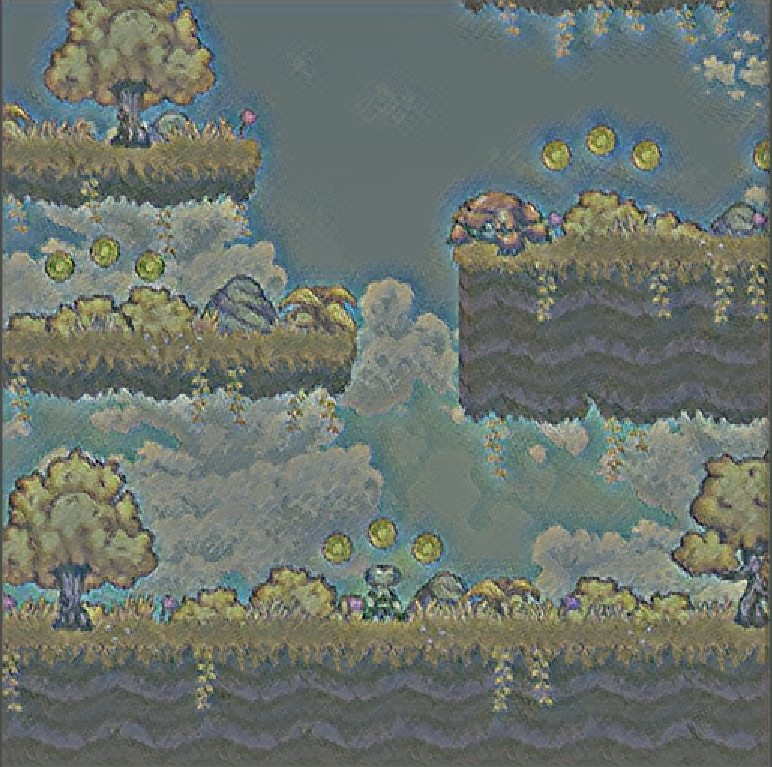 monet
monet 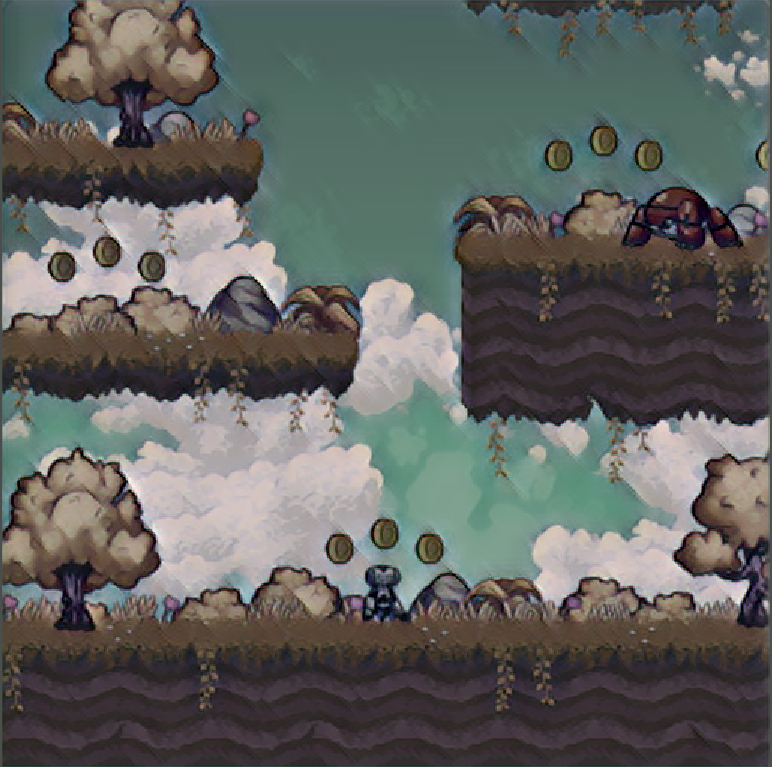 udnie
udnie 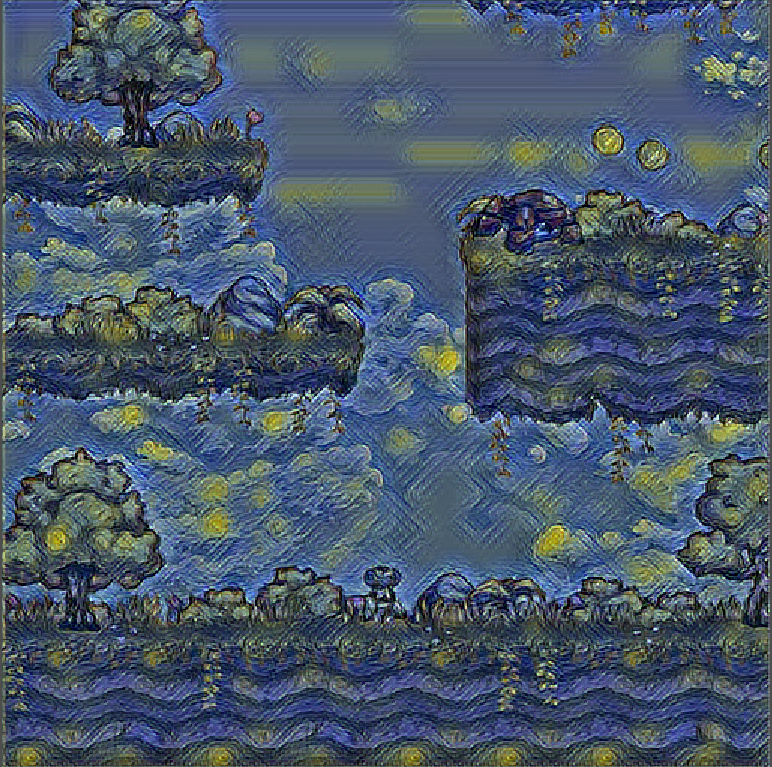 van gogh
  mosaic
 The Van Gogh style was the crowd favorite, those coins turning into Starry Night orbs is genuinely delightful. The Mosaic style looked surprisingly good on pixel-art-style games.
Reflections
What Worked
The feed-forward architecture was the right call from day one. The fully convolutional refactor for dynamic input sizing was the most important single modification; without it, the plugin would only work at one fixed resolution. The GDExtension API was cleaner than I expected; Godot’s node-based architecture mapped naturally onto the capture-process-display pipeline.
And starting with the slim model turned out to be accidentally brilliant. I spent time on the normal model assuming more parameters meant better results, then discovered the slim model was better for the actual use case. Sometimes the simplest architecture wins.
What’s Rough
Let me be honest about the state of this codebase.
The model path is hardcoded to /home/sushanth/Dev/SML-Godot/ArtSynapse/model.pth.
The build system has hardcoded paths to my local libtorch installation.
The FPS counter prints to stdout on every single frame, not every 20
seconds like the commented-out version suggests. The ONNX export path exists
but the inference function literally has a bare return with no value.
def onnx_infer(path, img):
    sess = rt.InferenceSession(path)
    input_name = sess.get_inputs()[0].name
    out = sess.run(None, {input_name: img.astype(np.float32)})[0]
    return  # ← this returns None. ask me how I know.
It’s a “works on my machine” binary. The cuDNN dependency means building it on another system requires exactly the right CUDA toolkit version, the right cuDNN version, and a willingness to read CMake error messages for an afternoon.
What I’d Do Differently
Profile GPU memory from day one instead of discovering the contention between Godot’s renderer and PyTorch late in the project. Start with the slim model instead of assuming the normal model would be better. And tackle temporal consistency early; a simple exponential moving average blend between consecutive stylized frames would have reduced flickering significantly with minimal performance cost.
Future Directions
Dynamic model loading at runtime, so you could switch styles during gameplay without restarting. Asset-specific styling: apply style transfer to just the skybox or tilemap rather than the whole viewport. A Colab training notebook so other developers could train custom style models without setting up a local PyTorch environment.
The Thing About Course Projects
This was built for a Statistical Machine Learning course at ASU. The kind of project where the scope starts reasonable and then you find yourself debugging CUDA linker errors at 2am because you decided “just hook a neural network into a game engine, how hard can it be?”
The model is 110 kilobytes. The build system that compiles it is more complex than most production deployments I’ve worked on. The hardcoded paths are embarrassing. The FPS logging is noisy. The ONNX export is broken.
But it runs. A 2D platformer, rendered in Van Gogh’s style, at 52 frames per second. You can jump, shoot, collect coins, and the whole world looks like a painting.
It runs. I’ll take it.